
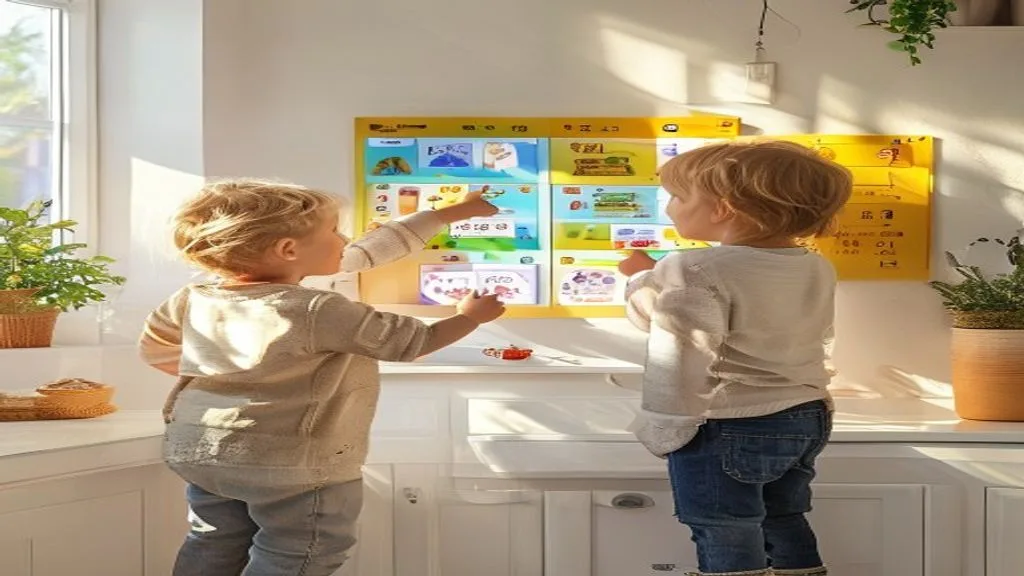
A visual schedule for a toddler daily routine transforms chaos into clarity—giving your child a concrete, picture-by-picture roadmap of what comes next, without relying on language they may not yet fully understand. When you make a visual schedule for toddler transitions, you're not just organizing the day; you're building your child's independence, reducing anxiety-fueled tantrums, and giving yourself a powerful tool that works whether your toddler has typical development or uses alternative communication methods. This guide walks you through everything you need to know, from choosing materials to teaching your child to use the schedule, plus a hybrid template approach that solves the "generic icons vs. personal photos" dilemma.
Key Takeaways
- Visual schedules reduce toddler transitions stress by making routines predictable and concrete.
- You can build one using free printables, personal photos, or a hybrid approach combining both.
- Laminating pouches and velcro dots make schedules durable and reusable for years.
- Teaching your child to use the schedule takes 2–4 weeks of consistent, playful practice.
- Visual schedules support toddlers with autism, speech delays, and all learning styles.
Why Visual Schedules Work for Toddlers
Toddlers between 18 months and 4 years live largely in the present moment. They don't yet grasp abstract concepts like "after lunch we'll nap," but they understand pictures. According to research from the Early Childhood Mental Health Collaborative, visual schedules reduce anxiety and problem behavior by helping children anticipate what's coming, giving them a sense of control and predictability.
Transitions are the biggest flashpoint in a toddler's day—moving from play to meals, from home to childcare, from activity to bedtime. Without a visual roadmap, your child may feel blindsided and resist. A visual routine chart with pictures lets them see the sequence themselves, which is far more powerful than you telling them "it's time to stop playing." This approach also works exceptionally well for toddlers with autism, speech delays, or sensory sensitivities, as it removes the pressure to process verbal instructions in real time.
Materials You'll Need: A Practical Checklist
Building a durable, reusable schedule doesn't require expensive equipment. Here's what most parents find essential:
- Photos or images: Personal photos of your child (eating breakfast, brushing teeth) or free printable icons from sources like A Day in Our Shoes or Boardmaker Online. Personal photos feel more meaningful but require a smartphone and printer.
- Laminating pouches (3×5 inch): Available at office supply stores ($8–12 per pack). These protect cards from sticky fingers, spills, and repeated handling. A heat laminator is optional; most pouches work with an iron on low setting.
- Velcro dots or adhesive strips: Dollar stores carry these; they're essential for reusable, movable icon toddler schedules. Buy two packs (one for the board, one for the back of cards).
- Mounting surface: A whiteboard, foam board, cardboard, or the side of your fridge works fine. For magnetic schedules, use a magnetic board ($10–20) and apply velcro or magnetic strips.
- Optional: First-then board: A simple two-pocket holder that shows "first" (the current task) and "then" (what comes next). This is especially helpful for transitions and young toddlers aged 18–24 months.
- Scissors and a glue stick or double-sided tape.
Many families find that combining a few of these creates the most flexible system: laminate a core set of routine cards you use daily (breakfast, teeth, nap), add blank cards for unexpected activities, and use velcro dots so your child can physically move cards as the day progresses.
Step-by-Step: How to Build Your Schedule
Step 1: Choose Your Routine and Decide on Scope
Start with one predictable routine—usually morning or bedtime—rather than trying to map the entire day at once. A morning routine visual schedule toddler typically includes 5–8 steps: wake up, eat breakfast, get dressed, brush teeth, shoes on, out the door. A bedtime visual schedule typically has 6–7 steps: bath, pajamas, brush teeth, story, songs, lights out.
Write down the exact sequence in the order your child experiences it. Keep steps specific and observable ("brush teeth for 2 minutes") rather than vague ("get ready"). This clarity helps you teach the schedule and makes it easier for your child to follow.
Step 2: Gather or Create Images
You have three main options:
| Approach | Pros | Cons | Best For |
|---|---|---|---|
| Personal Photos | Highly motivating; your child sees themselves; easy to update | Requires a camera/phone, printing, and ongoing maintenance | Toddlers 2–4 years; families with strong visual learners |
| Free Printable Icons | Low cost; no photography; instant; ready to laminate | Generic; less personally engaging; may not match your exact routine | Quick setups; budget-conscious families; smaller routines |
| Hybrid (Photo + Icons) | Balanced; personal photos for key steps, icons for transitions; most flexible | Requires some curation and printing effort | Most families; supports all learning styles |
For a hybrid approach, take a smartphone photo of your child doing each main step (eating breakfast, brushing teeth, getting dressed). Use a free icon set for transitions like "transition visual aids" steps (waiting, walking, sitting). Print photos at 3×5 inches and icons at the same size for consistency.
Step 3: Laminate and Prepare Cards
Once your images are printed, laminate each card using self-adhesive pouches or a laminator. Let pouches cool for 30 seconds, then trim away excess plastic with scissors. Laminating protects cards and signals to your child that this is a durable, important tool—not a paper toy.
Apply velcro dots to the back of each card (hook side) and to your mounting board (loop side). This allows your child—and you—to move cards throughout the day, which reinforces the sequence and gives your child agency.
Step 4: Mount Your Schedule Prominently
Location matters. Place your visual routine chart at your child's eye level and in the room where the routine happens (morning schedule by the bathroom, bedtime schedule by the bedroom door). Avoid clutter; your child should see the schedule clearly without competing visual noise.
If you prefer a flexible, magnetic visual schedule for toddlers, use a magnetic board and magnetic strips instead of velcro. This is durable, reusable across years, and works well for families with multiple children.
Teaching Your Toddler to Use the Schedule
Creating the schedule is half the work; teaching your child to use it is where the real magic happens. Expect this to take 2–4 weeks of consistent, brief, playful practice.
Start by sitting with your child in front of the schedule during a calm moment (not during a rushed morning or cranky evening). Point to the first card and name it together: "First, breakfast!" Take the card off the board together, do the activity, and return after completion. Celebrate with enthusiasm—this builds excitement and intrinsic motivation. Repeat this process for 2–3 steps per day for the first week. Gradually increase independence by stepping back and letting your child point, remove, and replace cards.
If your child resists or gets distracted, don't force it. Some toddlers need to see the schedule used by a parent or sibling first before they engage. Others prefer a first-then board that shows only the immediate next step, which reduces overwhelm for anxious or younger toddlers (18–28 months).
Use positive reinforcement—praise effort, not just compliance: "You looked at the schedule and knew it was time for breakfast! You're such a good helper." This reinforces the routine itself, not just obedience.
Visual Schedules for Toddlers with Autism and Communication Delays
Visual schedules are especially valuable for toddlers on the autism spectrum or with speech delays. According to Brightwheel's guide to visual schedules, they reduce sensory overwhelm, eliminate the need to process rapid verbal instructions, and provide a concrete checklist format that many children with autism find grounding.
For these children, consider these adaptations: Use high-contrast, simple images (avoid busy, multi-colored backdrops). Add sensory cues like a timer card if your child needs to understand duration. Offer a "finished" or "all done" board where your child can move completed cards, which provides closure and a satisfying motor component. Keep the schedule in a central location and reference it consistently; routine and predictability are calming for autistic children.
Many families of children with autism find that a laminated checklist format—simple text labels paired with small icons—works better than photographs, as it's less emotionally variable and easier to manage.
Troubleshooting Common Challenges
Even well-designed schedules hit snags. Here's how to adapt:
- Your child ignores the schedule: They may not yet understand the connection between the picture and the action. Try using the schedule yourself first ("Mama's using the schedule—breakfast time!"), then gradually involve your child. Keep first sessions to 1–2 minutes.
- Your child gets distracted or stalls: A transition visual aid like a timer card or a "take a break" option can help. Some children need 30 seconds of notice before transitions; add a "get ready" card before the main activity.
- Cards get lost or torn: Laminate extras and store spares in a labeled envelope. Update photos seasonally or as your routine changes.
- Your child runs through the schedule too fast: Slow it down by adding a brief sensory step ("take a deep breath," "give a high-five") between tasks, or use a timer so your child understands pacing.
Free Printable and Hybrid Template Options
If you're short on time, start with free printable visual schedules from reputable parenting sites, then customize them with personal photos as you settle into the routine. Many parents also use Google Slides or Canva to create hybrid templates: download a free routine icon set, add photos of your child from your phone, print, laminate, and go. This hybrid approach takes about 30 minutes and delivers the engagement of personal photos with the speed of printables.
Several parenting apps also allow you to upload photos, generate a custom schedule, and print it directly—useful if you're less DIY-inclined. However, the physical, tangible card version tends to be most effective for toddlers because they can touch, move, and manipulate it.
Frequently Asked Questions
How do I make a visual schedule for my toddler with pictures?
Take photos of your child doing each routine step (eating, brushing teeth, getting dressed) using your smartphone. Print at 3×5 inches, laminate using self-adhesive pouches, and attach velcro dots to the back so they're movable. Arrange them in order on a board at your child's eye level. This personal-photo approach is highly motivating because your child sees themselves.
What are the best free printable visual schedules for toddlers?
A Day in Our Shoes, Boardmaker Online, and Pinterest boards dedicated to toddler routines offer high-quality free printables with simple, clear icons. Many also come in editable PDF formats so you can customize text. Download several options, print, laminate, and test them with your child before committing to a full setup.
How can a visual schedule help reduce toddler tantrums?
Tantrums often spike during transitions because toddlers feel blindsided and lose control. A visual schedule gives them advance notice and lets them anticipate what's next, reducing anxiety and surprise. It also shifts the power dynamic—your child can check the schedule themselves rather than waiting for your instruction, which increases buy-in and cooperation.
Should I use photos or generic icons for a toddler schedule?
Personal photos are more engaging and motivating, especially for toddlers aged 2–4 years. However, generic icons are faster and work well for anxious children who prefer predictable, consistent imagery. The hybrid approach—personal photos for main activities and icons for transitions—balances engagement, flexibility, and ease of use.
What materials do I need to make a durable toddler visual schedule?
You'll need photos or printed icons, laminating pouches or a laminator, velcro dots, scissors, and a mounting surface (foam board, whiteboard, or magnetic board). All these items cost under $30 and last for years. Laminating is the key to durability—it protects cards from sticky fingers and wear.
Building a visual schedule takes just an afternoon, and the payoff—smoother mornings, fewer battles, and a more independent, confident toddler—lasts far longer. Start small with one routine, celebrate small wins, and watch your child's ability to navigate transitions grow. Your visual routine chart isn't just a management tool; it's a gift of predictability and agency to your child.


Comments 0
Please Sign in to leave a comment.
No comments yet. Be the first to share your thoughts!